Tuesday, 28 January 2020

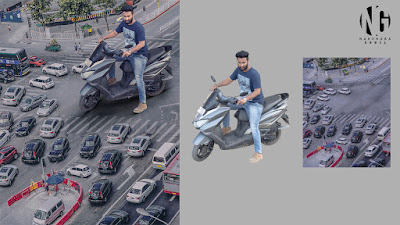
Stuck in traffic jam photo manipulation

Tital:
stuck in traffic jam photo manipulation

Intreduce my self:
I am narendra gohel i passionate about professionals photo and video editing.in Beginning i used picsart app for photo editor now i am professionals on photoshop. If you have any photoshop pad work control me on gmail : gohel707@gmail.com i am do photo editing and video editing both

Intro about stuck in traffic jam photo manipulation :
If you have a big car or bike, then getting stuck in a traffic is not a big deal. Because there is so much population in India and outside India that people would get stuck in traffic.I thought that so many people get stuck in traffic, then a photo editing was made on it.

What you need to creat stuck in traffice jam photo manipulation :
In this photo editing I used only two photos Model photo and background.But apart from the photo you will need a computer or pc and photoahop cc software.and some photoshop knowledge.link to the photo stock download is given at the bottom of this post.

Steps to creat stuck in traffic jam photo manipulation:

1.open photoshop cc software and add background photo.background photo download link is given bellow in this post

2.add model photo on photoshop. Adject size and position.model photo download link is given at the bottom of this post


3.erase model photo background. You can used any method you like. pen tool, channel, quick selection tool. As you like

4.now time to match subject to background.goto adjustment select levels.click on cliping layer and used slide to match brightness and also used brightness adjustment to

5.time to match colour goto adjustment select colour balance. Click cliping button to clip layer. Used slide to match colour

6 now time to creat shadow. Creat new layer under subject

7.select black bruesh and creat big black dot. Control+t to adject size and position

8.control+j to copy layer. Control+t to adject size and position

9.creat new layer and make shadow using black bruesh

10.contorl+alt+shift+e to creat merge layer

 11.now used camera raw filer to get you effect

Now finally photo is ready

Background photo download link

Editing photo download link

If you like my work you can order for pad photo editing and also you can follow me on social media
instagram
https://www.instagram.com/narrrendra

facebook
https://www.facebook.com/narendragohel707

Whats up
+91 7600094367

youtube channle
https://www.youtube.com/c/narendragohel

telegram
https://t.me/narendragohel
Tuesday, 24 December 2019

Christmas photo editing in Photoshop

Intro:
So in this post we learn.Christmas photo editing in Photoshop. You can also see video about this topic on you tube. Just search narendra gohel or Christmas photo editing in Photoshop

Introduce my self:
Hello guys narendra gohel is here. I am editor. I am 30 year old. I try to copy all types of photo editing in Photoshop. If you have see any photo you like just share me in gmail id: gohel707@gmail.com i try to copy that type of photo editing and share with you that video so you can also try that

What do you need:
1.camera or mobile phone to capture you photo
2.pc or laptop to run Photoshop
3.stock image like model photo, scissor png. all they stocks photo download link is bottom of thispost

How to download stocks:
You can find download stocks link bottom of this post. Just click on download button you direct go to download page

Steps to creat 
Christmas photo editing in Photoshop

1.add photo in photoshop

 2.now remove background goto channel and select high contrast layer and copy that

3. Goto image > adjustment > levels

4.used three slider to make background white and model photo black

5. Press control and click that layer to make selection

6.click RGB >layers >press control and click on mask button

7.add background photo. Adject size and position

8.putt download background layer 

9.click on mask select brush and take white colour and start fill object

10.add cap png. Adject size and position

11.goto edit >pupped warp

12.creat point and move point to make you shape

13. Contro+alt+shirf+e to make merge layer

14 goto filter>camera raw filter. Us slider to creat you effect. If you copy my effect see this screenshot
Model photo download link

cap photo download link

Thumbnail photo download link

background photo download link

editing photo download link

instagram
https://www.instagram.com/narrrendra

facebook
https://www.facebook.com/narendragohel707

Whats up
+91 7600094367

youtube channle
https://www.youtube.com/c/narendragohel

telegram
https://t.me/narendragohel

Sunday, 22 December 2019

Creative photo manipulation editing inspired by lex wilson in photoshop

Intro:
So in this post we learn. Creative photo manipulation editing inspired by lex wilson in photoshop. You can also see video about this topic on youtube. Just search narendra gohel or Creative photo manipulation editing inspired by lex wilson in photoshop

Introduce my self:
Hello guys narendra gohel is here. I am editor. I am 30 year old. I try to copy all typea of photo editing in photoshop2019. If you have see any photo you like just share me in gamil id: gohel707@gmail.com i try to copy that type of photo editing and share with you that video so you can also try that

What do you need:
1.camera or mobile phone to capture you photo
2.pc or laptop to run photoshop2019
3.stock image like model photo, scissor png. all tha stocks photo download link is bottom of this post

How to download stocks:
You can find download stocks link bottom of this post. Just click on download button you direct go to download page

Steps to creat 
Creative photo manipulation editing inspired by lex wilson
1. Add model photo in photoshop. Just drage and drop

2.now add another photo. Scissor png. Drage and drop. Adject size and position

3.click on mask button select bruesh take Black colour and start erase unwanted area

Model photo download link
Png photo download link
Thumbnail photo download link
instagram
https://www.instagram.com/narrrendra

facebook
https://www.facebook.com/narendragohel707

Whats up
+91 7600094367

youtube channle
https://www.youtube.com/c/narendragohel

telegram
https://t.me/narendragohel

Tuesday, 17 December 2019

How do I cut out a head in Photoshop

How do I cut out a head in Photoshop

Introduce my self:

Hello guys narendra gohel is here. I am editor. I am 30 year old. I try to copy all types of photo editing in Photoshop 2019. If you have see any photo you like just share me in gmail id: gohel707@gmail.com i try to copy that type of photo. editing and share with you that video so you can also try that

Intro:

So in this post we learn. How do I cut out a head in Photoshop. You can also see video about this topic on you tube. Just search narendra gohel or How do I cut out a head in Photoshop

What do you need:

1.camera or mobile phone to capture you photo
2. PC or laptop to run Photoshop 2019
3.stock image like model photo, background photo,some png .all they stocks photo download link is bottom of this post


How to download stocks:

You can find download stocks link bottom of this post. Just click on download button and you direct goto download page

Steps to How do I cut out a head in Photoshop

1. Add you photo or model photo in photoshop just drage and drop

2. Now remove background to used channel in Photoshop. Its simple way to remove background in Photoshop. Go to channel and final contract layer. Just copy

3. Goto image adjustment levels. now used that slider to make background white and subject to be dark

4. Press control and click on this layer to make selection

5. go to layer panel and press alt and click on layer mask button. now background is perfect cut-out. Drag and drop background photo in Photoshop. And set size and position. Drag down background layer

6.click on mask button twice. Now refined edge

7.select brush and take Black color and start to remove extra object

9.select rectangular marquee tool.start selection t-shirt. Click layer thumbnail

10.press control+j and pull down that layer. Control+t to set size and position

11.select curvature pen tool and make path

12. Wright click. Select make selection. Father valu two

13. select mask layer take brush start erase unwanted area

15. Create new layer pull down and clip it using alt key

16. Take brush select black color and start creating shadow

17. Press shift button and click this layer to select both layer 

18. Press contrail e on keyboard to merge both layer in one

19. Select up layer.select curvature pen tool and make path

20.wright click make selection father valu zero

21. Click on mask take brush with black color start erase unwanted area

22. Press contacts+d to deactivate selection

23.select curvature pen tool to make another path

24.wright click and select make selection. Father valu is zero

25. create new layer pull it down. Select brush. Press alt and select dark color of you skin. Start paint

26. Press control+d to deactivate selection. create new layer press alt and click on layer to clip layer

27. Select brush take black color and start to create shadow

28. Press shift and click that layer. Press control+e to merge both layer in one


29. Double click on this layer. select bevel and emboss. Copy that setting


30. Select first layer press control+alt+shift+e to create merge layer

31. go to filter camera raw filter.i achieve this effect. If you wan this effect see screenshots sample


all stock and png download link is bellow 

thumbnail photo download link

Background photo download link

editing photo download link

model photo download link

png download link

so i hope you guys like my post. you can follow me on this
instagram

facebook

whats up
+91 7600094367 

youtube channle


Stuck in traffic jam photo manipulation

Tital : stuck in traffic jam photo manipulation Intreduce my self : I am narendra gohel i passionate about professionals photo a...