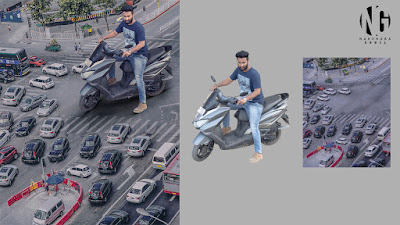
How do I cut out a head in Photoshop
Introduce my self:
Hello guys narendra gohel is here. I am editor. I am 30 year old. I try to copy all types of photo editing in Photoshop 2019. If you have see any photo you like just share me in gmail id: gohel707@gmail.com i try to copy that type of photo. editing and share with you that video so you can also try that
Intro:
So in this post we learn. How do I cut out a head in Photoshop. You can also see video about this topic on you tube. Just search narendra gohel or How do I cut out a head in Photoshop
What do you need:
1.camera or mobile phone to capture you photo
2. PC or laptop to run Photoshop 2019
3.stock image like model photo, background photo,some png .all they stocks photo download link is bottom of this post
How to download stocks:
You can find download stocks link bottom of this post. Just click on download button and you direct goto download page
Steps to How do I cut out a head in Photoshop
1. Add you photo or model photo in photoshop just drage and drop
2. Now remove background to used channel in Photoshop. Its simple way to remove background in Photoshop. Go to channel and final contract layer. Just copy
3. Goto image adjustment levels. now used that slider to make background white and subject to be dark
4. Press control and click on this layer to make selection
5. go to layer panel and press alt and click on layer mask button. now background is perfect cut-out. Drag and drop background photo in Photoshop. And set size and position. Drag down background layer
6.click on mask button twice. Now refined edge
7.select brush and take Black color and start to remove extra object
9.select rectangular marquee tool.start selection t-shirt. Click layer thumbnail
10.press control+j and pull down that layer. Control+t to set size and position
11.select curvature pen tool and make path
12. Wright click. Select make selection. Father valu two
13. select mask layer take brush start erase unwanted area
15. Create new layer pull down and clip it using alt key
16. Take brush select black color and start creating shadow
17. Press shift button and click this layer to select both layer
18. Press contrail e on keyboard to merge both layer in one
19. Select up layer.select curvature pen tool and make path
20.wright click make selection father valu zero
21. Click on mask take brush with black color start erase unwanted area
22. Press contacts+d to deactivate selection
23.select curvature pen tool to make another path
24.wright click and select make selection. Father valu is zero
25. create new layer pull it down. Select brush. Press alt and select dark color of you skin. Start paint
26. Press control+d to deactivate selection. create new layer press alt and click on layer to clip layer
27. Select brush take black color and start to create shadow
28. Press shift and click that layer. Press control+e to merge both layer in one
29. Double click on this layer. select bevel and emboss. Copy that setting
30. Select first layer press control+alt+shift+e to create merge layer
31. go to filter camera raw filter.i achieve this effect. If you wan this effect see screenshots sample
all stock and png download link is bellow
thumbnail photo download link
Background photo download link
editing photo download link
model photo download link
png download link
so i hope you guys like my post. you can follow me on this
instagram
facebook
whats up
+91 7600094367
youtube channle


No comments:
Post a Comment